35 MRI field correction
35.1 N4ITK MRI Bias Correction
Reference: https://doi.org/10.54294/jculxw
The N4ITK MRI Bias Correction module in 3D Slicer is used to correct for intensity non-uniformities (also known as bias field or inhomogeneity) in MRI images. This correction is essential for preprocessing in radiomics studies, as it standardizes the image intensities across the scan, making radiomic features more consistent.
Here’s a step-by-step guide to using this module:
35.1.1 Step 1: Open the N4ITK MRI Bias Correction Module
- Launch 3D Slicer and load the MRI brain scan that you want to correct.
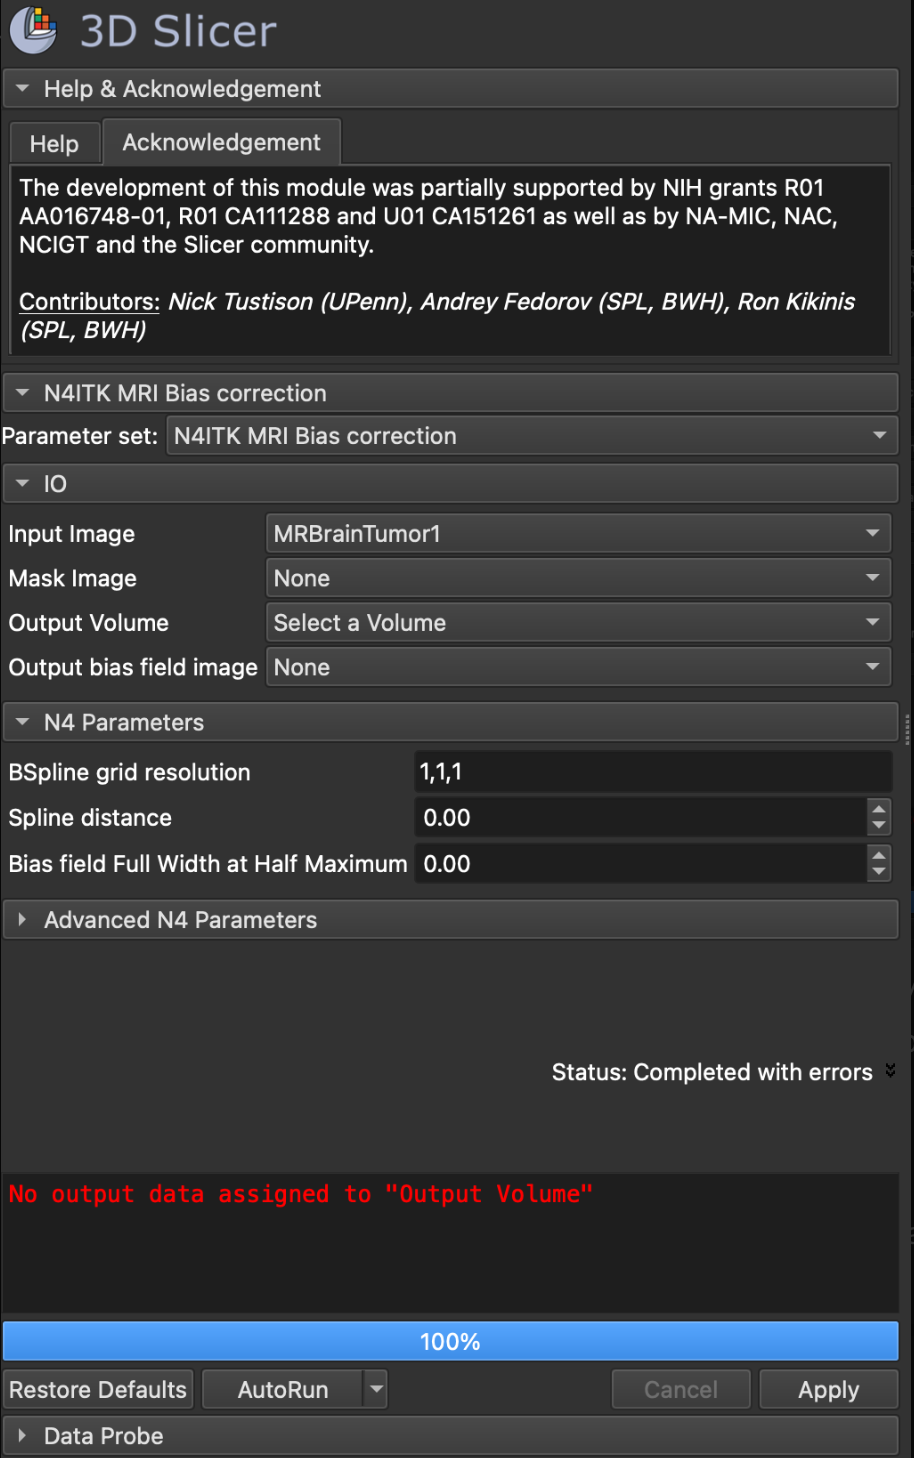
- Go to the N4ITK MRI Bias Correction module (as shown in the screenshot).
35.1.2 Step 2: Set the Input and Output Parameters
- Input Image: Select your MRI image (e.g., “MRBrainTumor1” in your screenshot).
- This is the image that will be corrected for bias field inhomogeneity.
- Mask Image (Optional): Select a mask if you want to restrict the bias correction to a specific region.
- For most general cases, you can leave this as
None, and the entire image will be corrected. - If you have a brain mask (for example, masking out non-brain tissue), using it can improve the correction by focusing only on relevant areas.
- For most general cases, you can leave this as
- Output Volume: Choose a name or an output node for the corrected image.
- Click on Select a Volume and create a new volume (e.g., “Corrected_MRI”) to store the output. If you skip this, you’ll encounter the error message shown in your screenshot.
- Output Bias Field Image (Optional): You can specify an output for the bias field itself (the estimated non-uniformity map).
- This is useful if you want to visualize or analyze the bias field separately, but it’s not necessary for general correction.
35.1.3 Step 3: Configure N4 Parameters (if necessary)
- BSpline Grid Resolution: Defines the resolution of the bias field model. Higher values yield a more detailed correction but take longer to process.
- For brain MRIs, typical values are around
1,1,1or2,2,2.
- For brain MRIs, typical values are around
- Spline Distance and Bias Field Full Width at Half Maximum: These settings are advanced and can usually be left at default (
0.0) for general use. Adjust these only if you have experience with N4ITK parameters and know they need modification.
35.1.4 Step 4: Configure Advanced N4 Parameters (Optional)
- Expanding the Advanced N4 Parameters section gives you control over additional settings, like convergence criteria and maximum iterations.
- For most users, the default settings work well, but you may explore these options if the default parameters do not yield satisfactory results.
35.1.5 Step 5: Run the Bias Correction
- Once everything is set, click Apply.
- The module will process the input image, applying the bias correction algorithm.
- You should see a progress bar at the bottom of the module. Once it reaches 100%, the corrected image will be saved in the Output Volume you specified.
35.1.6 Step 6: Review the Output
- Go to the Data module and select the Output Volume (e.g., “Corrected_MRI”) to visualize the result.
- Scroll through the slices to ensure that the intensity inhomogeneities (brightness inconsistencies across the image) have been corrected.
- Compare the original and corrected images by toggling visibility to verify that the bias field correction was successful.
35.1.7 Tips for Using N4ITK Bias Correction in Radiomics
- Always Review the Output: Check the corrected image for any residual artifacts or issues, especially if you’re working with images with significant inhomogeneity.
- Use a Mask (if needed): For brain MRIs, applying a brain mask can sometimes improve the quality of the bias correction by excluding non-brain regions that may interfere with the algorithm.
- Parameter Adjustment: While the default settings work for most cases, adjusting parameters like the BSpline Grid Resolution can improve results depending on the image characteristics.
Following these steps should help you effectively apply bias correction to your MRI images, preparing them for radiomics feature extraction.
